The "Smart Patch" Tool
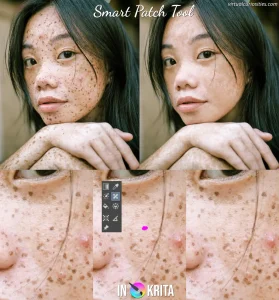
Did you know that Krita has a tool that lets you quickly remove any object from an image? It's called the "smart patch" tool and it has been in the toolbox this whole time! You can even remove a whole person from a photo you took at the beach. Just click on it and draw over the object you want to remove and Krita will automagically fill the painted space with pixels from the neighboring areas!

You can even retouch skin with it!
Non-Destructive Transforms
If you ever needed to add an image such as a watermark to another image and scale it, you probably noticed that if you scale down the image, and then scale it up again, it starts getting blurry because the transformations are destructive: the second operation isn't applied on the original image, but on the result of the first transformation. Fortunately, Krita has a solution for this: non-destructive transforms called "transform masks."
Simply add a transform mask to a layer and then transform the transform mask instead of the layer. Then you can scale it down and up again without issue!
Clone Layers
Krita's clone layers are a rather unique feature! They allow many capabilities that are otherwise only found in node-based non-linear editors (NLE). For example, you can create your own drop shadow by cloning a layer, applying a transform to it, then changing its color!

Alpha Layer Blending Modes
Besides the usual color layer blending modes Krita also comes with many alpha blending modes most people will never bother learning about. You can use them to do all sorts of advanced alpha masking tricks!
The "erase" mode turns the layer into an eraser. Its opaque pixels will erase the pixels from the layers below. This sounds a bit useless at first, but your "eraser" layer is inside of a layer group, only the pixels of other layers inside the group will be erased. You can combine this with clone layers to create all sorts of advanced effects!
The "destination in" mode turns the top layer into a clipping mask for the layers under it. The "destination atop" works in a similar way, but besides clipping it will also draw the layer on areas that are transparent in the layers underneath.

Halftone Pattern Generator
Krita has a halftone filter that can generate all sorts of patterns, if you can figure out how to use it.
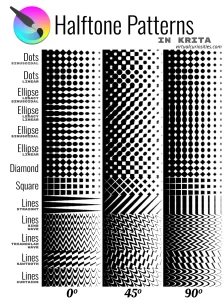
You can even combine it with other filters to create cool halftone gradients.

Reference Images
Did you know you can add an image to a Krita canvas that stays outside the canvas and isn't exported? These "reference images" can be useful for all sorts of things, including working as a mood board if you wish.
Tip: need more referencing power? Try BeeRef!
Multiple Views of Same Document
Have you ever wanted to work on one area of a document zoomed in while having a good idea of how it looks zoomed out? You can do this in Krita! It's not as easy as in Clip Studio Paint, but it's doable!

Compositions
Have you ever worked with a project that for one reason or another you had to hide and display a set of layers before exporting? If only there was an easier way to do this than manually hiding and displaying layers one by one every time you made a change! Well, luckily, there is a way for this in Krita: the compositions docker!
This docker lets you create multiple "compositions" which are sets of visible layers. When you switch from one composition to another, the layers that are visible automatically change. In essence, it just keeps track of what is visible and what is hidden.
The coolest thing about compositions is that Krita can export multiple compositions in batch. This means if you have 82 different compositions, you can export all of them with one click to save 82 different PNG's! (I used this once to generate all the duotone samples of my duotone template pack for Krita).
Non-RGB and Higher Color Depth Images
If you are an amateur, it's likely you have no idea what color depth and non-RGB color models are. You should probably learn about them because they'll make your work better.
Krita has support for 16-bit and 32-bit color depths and the lightness-based L*a*b color model.
If you have a 8-bit or 10-bit screen, you won't be able to see the full range of 16-bit colors, but the pixels will still be edited in 16-bit precision. This means that gradients, blurring, mixing, and smudging effects will be processed with greater precision, reducing banding artifacts that occur in 8-bit depth. Most importantly, applying multiple layers of contrast and hue filters to a base image won't give you rounding errors.
With the L*a*b color model mixing colors of different brightness's and hues works better. By default, semi-transparent blushes apply a simple alpha-based interpolation on the color of the brush applied on the canvas. This math doesn't work very well perceptually with RGB, but it works perfectly with L*a*b. Using L*a*b makes color blending work the way it should, so most digital artists benefit from using it instead of RGB.
Krita also comes with various color profiles that you can choose from by default, including gamma-corrected (perceptual) sRGB, linear sRGB, and the wide gamut Rec.2020, courtesy of [Elle Stone (accessed 2025-06-30)].

Importing Video
Krita can import frames of a video into a new document so that you can edit it using Krita's animation timeline. This is generally a terrible idea since videos can be pretty long and Krita will probably just crash and run out of memory trying to process them, however, there are a few cases where Krita's timeline can be very useful.
For example, if you take a video recording, perhaps from OBS Studio, and clip an short, interesting part of it in Avidemux, you can import that clipped section into Krita, remove unnecessary frames, and export it as tiny, tiny animated GIF or WebP.
