Adding a Grayscale Halftone Effect to a Photo
To apply a grayscale halftone effect to a photo in Krita, follow the following steps:
1: open the photo you want to edit in Krita.
2: add a filter layer by clicking on the arrow button in the Layers docker.

3: the first filter we will add is Adjust -> Desaturate, which will make our image grayscale. The halftone filter that we will use also makes the image grayscale, but by using Desaturate first we can choose a desaturation method.
4: for photos, luminosity-based desaturation methods provide better quality, such as BT.709 or BT.601, as they calculate each RGB color channel as having a different level of luminosity at its maximum intensity. There isn't much difference to the default when halftoning in many cases, but sometimes a photo might look better with this effect if you use the Min or Max methods. In any case, having more choices is a good thing. Let's select BT.709 for now.

5: click OK to add the desaturate filter layer. You should see the new filter layer in the Layers docker.
6: add another filter layer. This time the filter that we want is Adjust -> Levels. You can simply select it and click OK without changing anything for now.

7: make sure that the Levels filter is above the Desaturate filter on the stack.
8: add another filter layer. This time the filter that we want is Artistic -> Halftone. This filter is the filter that actually creates the halftone pattern out of the lightness of the pixels.

The halftone filter has lots of settings you can play with, including various different shapes for the halftone effect. These shapes even look different depending on the Rotation angle you pick for them.

Tip: you can get even more patterns by checking the Invert option in the Postprocessing tab of the screentone!
For now, there only one setting that we want to change.
9: click on the Transformation tab in the halftone filter settings.
10: change the Resolution of the halftone effect until the size of the screentone pattern matches what you want. It's alright if the halftone looks too bright or too dark (too much white or too much black), we'll adjust that later.
Tip: you can change Size Mode to Pixel based to input a size in pixels.
Tip: in general, the halftone effect looks better with close up photos and with a smaller screentones. Using a large screentone just makes it difficult to tell what you are looking at. If the photo isn't a close up, the details will be so small that the halftone effect will make a mess out of them. For this reason, if you are working with a photo of someone's face, for example, it's a good idea to have a photo large enough that you can see multiple dots of the screentone in their iris.
11: click OK to add the halftone filter.
12: make sure that the halftone filter is above the Levels filter on the Layers docker.
- Halftone filter
- Levels filter
- Desaturate filter
- Your photo
13: right click on the Levels filter you added on the Layers docker to display its context menu and click "Properties..." (keyboard shortcut: F3). This will open the dialog with the Levels settings.
Observation: as of version 5.2.9, Krita won't display the histogram for the levels filter when you create it, but it will display the histogram when you edit it.(bug #506108)
14: move the three control points in the Input Levels part the Levels filter to adjust which lightness should become fully black, which should become fully white, and where the mid-gray point is.
Tip: in general, you'll want to move the mid-gray point to the right in order to make the image darker if you are working with a photo of someone that doesn't have a dark skin color to begin with. That's because if you don't do that the halftone will be too white, and that won't look as good. Making the image darker will add "shading" to the halftone.
15: save your image.

Adding a Colored Halftone Effect to a Photo
There are several methods we can use to make our halftone effect colored instead of black and white.
Colored Halftone Overlay
The first method we can use to make our halftone colored is to overlay our starting image on the halftone using a special blend mode.
1: use the tutorial above to create a grayscale halftone effect. If you have already followed the tutorial above, let's continue from there.
2: create a new clone layer of your photo layer by selecting it and adding a new clone layer.
3: move the clone layer to the top of the layer stack, above the screentone filter layer.
4: change its blend mode from Normal to Mix -> Hard Overlay.

Tip: experiment with other blend modes if you wish!
Tip: if you want to make the halftone more colorful, simply duplicate the clone layer to apply the Hard Overlay twice. That's two times more Hard Overlay than normal! A Harder Overlay! You know what would be great? If I could make Opacity 200% in Krita instead of duplicating the layer. Opacity overdrive! Now that sounds like an epic feature.
Duotone, Tritone, Quadtone Effects
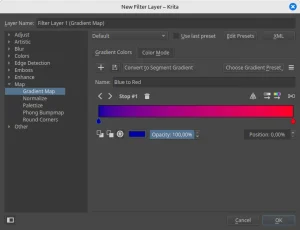
We can combine a halftone effect with a duotone effect. To do this, all we need is to add a gradient map filter on top of our existing filter stack.

See How to Create a Duotone Effect in Krita for a tutorial.
RGB Halftone Effect
In Krita, another method we have to create a colored halftone effect is to create separate screentones for each color channel instead of a single monochromatic color channel.
1: this time we'll start from scratch. You can either create a new document or simply hide the layer filters you have created so far if you are trying every method in this tutorial. The procedure is similar to the grayscale tutorial. We'll need a Levels filter layer to better control our halftone effect, and a Halftone filter layer to create the halftone effect itself.
2: in the Halftone filter settings, change Mode from Intensity to Independent Channels.
Assuming that your photo is using the default RGB color model, this create screentone patterns for Red, Green, and Blue, each with their own settings that you can customize.

Note: it's a bit of a hassle to use this filter if you want the same settings for all channels, since you have to redo your customizations manually for each channel!
Tip: you can make CRT looking RGB effect with the halftone filter by changing the screentone from dots to lines, changing thir angle to vertical, and placing red, green, and blue at different horizontal positions.
Tip: combine with a glow effect to make it even more CRT looking!
CMYK Halftone Effect
To make a CMYK halftone effect, simply follow the same process above but first change the color model of the document to CMYK.
1: click on Image -> Convert Image Color Space... on the menubar.
2: select CMYK/Alpha.
3: click OK to convert.
4: add the halftone filter like in the RGB method.

LAB Halftone
For the record, while you can use the Independent Channels with the LAB color model, it doesn't work very well because in LAB the "L" channel controls the lightness. LAB doesn't combine the way CMYK and RGB do.
On the other hand, with LAB it's possible to apply the halftone effect ONLY to the L channel and skip the other two, giving
Creating Halftone Backgrounds for Comics and Manga
If you are an illustrator, you might be interested in using a halftone effect to create screentone backgrounds in panels of comics and illustrations manga-style. You can accomplish this in Krita easily by using a vector layer, adding a black to white gradient to the shape, a halftone filter mask to create pattern, and a gradient map to change the color of the circles or "bubbles."
Reminder: Krita's halftone filter creates different shapes in linear and sinusoidal mode, which also change according to which Rotation angle you set in the filter. Generally the screentone effect that is used with increasingly large circles in one direction can be achieved with Dots in Linear mode. You can switch which color the circles are by checking Invert in the postprocessing tab.
