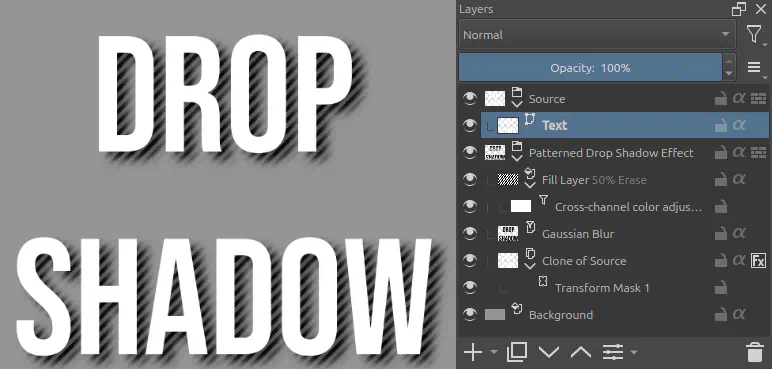
Method 1 with Angle and Distance
To add a drop shadow effect using angle and distance, which is good enough in most cases, follow the following steps:
1: open the graphic you want to add the effect to in Krita.
2: in the Layers docker, right click on the on the layer (or layer group) of the graphic you want to add a stroke to display its context menu, then select the option Layer Style..., this will open the Layer Styles dialog, which has a list-detail layout.


3: on the list pane, you should see Drop Shadow near the top, and to its left a square. This is a checkbox. Click on it to check the checkbox. Checking it activates the effect.
4: click on the Drop Shadow in the list pane to customize its parameters in the main pane.

Let's understand what each parameter does.
Blend Mode: this is the blend mode used with the effect. It's set to Multiply by default, which can only make colors darker. If you want to cast a "shadow" that is white, for example, you will need to change this to Normal.
Color: to the right side of the blend mode, there is a button that when clicked opens a color chooser dialog. This is the color of the drop shadow.
Opacity: this is the opacity of the effect. It's set to 75% by default. Make it higher if you want a stronger shadow, and lower if you want a fainter shadow.
Angle: this controls which direction is the drop shadow cast toward. More specifically, it controls which direction the light is coming from, so it's actually the opposite direction of the shadow. On top of that, 0 degrees isn't "up" like in a clock, it's actually "right," and its orientation is anti-clockwise. A bit confusing, if you ask me. For example, if we want to cast a shadow downwards, we need to set this to 90 degrees which means the light is coming from "above" (90 degrees anti-clockwise from the right). To cast it diagonally toward the bottom-right, as people usually do, the light needs to come from top-left, e.g. to cast it -45 degrees from the right anti-clockwise, we need to set it to 135 degrees anti-clockwise from the right. Fortunately there is a little control on the dialog that displays the direction, because I'd struggle with doing all this math just to cast a shadow.
Distance: this controls how many pixels away from the layer the shadow is cast. If you want to cast a drop shadow precisely X pixels toward the right, and Y pixels toward the bottom, this method will give you a lot of trouble. You can technically calculate the angle and distance you need, because it's like the Pythagorean theorem except in reverse, however distance can only be an integer, which makes some numbers impossible to get.
Size & Spread: the Size setting lets you make the shadow expand, growing larger than the layer it's cast from, which mimics how a real shadow would work when the object is far from the surface it's casting a shadow onto. Spread controls the blurriness of the expanded area. It works a bit like the color adjustment curves, except for the transparency. If you make Spread 100%, it makes almost every semi-transparent shadow pixel fully opaque, which makes the shadow more "solid," while if you make it 0% the shadow becomes more blurry, gradually changing from opaque to transparent at the edges.
Contour: I have some bad news, and some good news. The bad news is that it says it's Not Implemented Yet, so I don't know what it does. But actually I'm pretty sure that this is supposed to do exactly what Contour does in Photoshop, so I have some good news: we can just program this contour setting ourselves in Krita using layer filters, and we will actually learn how to do this below in this article. Anti-aliased can be toggled, but it appears not to do anything either. By the way, Krita has had layer styles for at least 4 years now, so if I were you I'd just assume nobody is ever going to implement this.
Noise: this setting adds an amount of noise to the drop shadow. I don't know why would anyone want this, but it's possible.
Layer knocks Out Drop Shadow: this setting makes it so that the opaque pixels of the layer erase the pixels of the drop shadow. Since the drop shadow is rendered under the layer, this is usually unnecessary, however if you have a layer with semi-transparent pixels, what is going to happen is that the shadow will be rendered under the entire layer, including under the semi-transparent pixels. This setting is supposed to help prevent that. Observation: when I tried this, it actually seems to be a bit buggy, considering that when you pan the canvas around there are strange artifacts in the rendering.
5: click OK to save the effect.
Method 2: by Horizontal and Vertical Distance in Pixels
An alternative method that we can use is to create the drop shadow effect ourselves using filter layers. This allows us to precisely various aspects of the drop shadow effect, some of which we wouldn't be able to with the simpler method.
Let's start with creating a simple drop shadow. To do this, follow the following steps:
Creating a Clone that is Fully Black
1: start by creating a simple scaffold for our simple effect: place the graphic you want to create the effect for inside a layer group, the create a clone layer of the layer group and place it inside a different layer group called "Drop Shadow Effect." This way, you can easily change the source of the effect or copy it later to other projects.
- Drop Shadow Effect (Layer Group)
-- Clone of Source
- Source (Layer Group)
-- Layers to apply the effect to
3: right click Clone of Source, and choose Layer Style... in the context menu to open its layer styles dialog, then add the Color Overlay effect. This effect has a blend mode, color, and opacity, just like the drop shadow effect, except that in this method what they mean is different.
Always set blend mode to Normal and Opacity to 100% so we can fully change the color of the layer. Color is the color you want your drop shadow to be, e.g. black. This should make your entire layer black. Note that if Source (Layer Group) is visible, you may see a bit of it underneath our effect at the moment.
Click OK to save the effect.
Moving the Shadow to the Side
1: in the Layers docker, select Clone of Source and add a Transform Mask to it so that we can freely move and transform it non-destructively.

2: select the newly added Transform Mask in the Layers docker. We will edit it.
3: select the Transform tool and move the mask a bit to the side. You should see that Clone of Source is moving to the side, while the Clone of Clone of Source remains in the same position.

Placing the Shadow behind the Source
Now we have a drop shadow, but there is a problem: the shadow is on top of the source that casts the shadow instead of behind it! How can we fix this? There are 3 methods, and which one you will use depends on the project.
The simplest method is to simply place the drop shadow effect layer group below the source layer group. That's basic layer stuff.
- Source (Layer Group)
-- Layers to apply the effect to
- Drop Shadow Effect (Layer Group)
-- Clone of Source (Color Overlay FX)
--- Transform Mask
A second method that we could theoretically use is to set the blend mode of Drop Shadow Effect to Behind. This makes it so that the layer group is blended as if it were at the bottom of the canvas (or of an outer layer group). If you have other things besides your source and effect in the canvas (or in a layer group), it won't look exactly the same since the shadow will be behind everything, even things that don't cast a shadow.
A third method is to create a second clone layer of of source and place it on top of the Drop Shadow Effect.
A fourth method is to create a clone layer of the clone layer of source, so that if you ever want to change the source all you need to do is change the source of the first clone layer. To do this, however, we would need to move the FX and transform mask to a layer group otherwise those would be cloned as well.
- Drop Shadow Effect (Layer Group)
-- Clone of Clone of Source
-- Shadow (Layer Group with Color Overlay FX)
--- Transform Mask
--- Clone of Source
- Source (Layer Group)
-- Layers to apply the effect to
While this is really cool, let's just use the first method because it's simpler and probably all you will ever need.

Now you should have a drop shadow effect. Let's see how we can port the other settings using Krita's non-destructive capabilities.
Opacity
To change the opacity of the shadow, simply change the opacity of the Drop Shadow Effect layer group.
Blurring the Shadow
To blur the shadow, all we need to do is add a filter mask or filter layer to Clone of Source and select a blur filter, such as Blur or Gaussian Blur. You can even select Motion Blur for your drop shadow if you want. In fact, you can even use two different types of blur if you want.

Spread and Contour
After blurring the shadow, we can emulate the Spread setting by adding another filter mask or filter layer to the Clone of Source. This time we want the Color Adjustment curves filter.

To control the spread, follow the following steps:
1: change the value of the Channel dropdown list button from RGBA to Alpha. This will allow us to manipulate the alpha of the pixels using the curves.
2: click on the curves line to create a new control point, and move it to one side or another to control the spread.
There are no rules to what you can do with this power. You can add as many control points as you want, and make the shadow wobbly around, or zig-zag. This is exactly what contour does in Photoshop, I believe, so this is how you can do it in Krita.

Warning: when you work with large amounts of blur and the curves adjustment filter together, you'll quickly run into rounding errors that create a banding effect if you are using a low color depth on your project. If this happens to you, there are two ways to make the shadow more high quality. The first method is to simply use a higher color depth or change the color depth of your current project from 8 bit per color channel to 16 bit. This makes it so that the alpha stops going from 0 to 255, and starts going from 0 to 65535, which should get rid of all your rounding problems in practice. Doing this also makes your project files much larger and consume a lot more resources to process, so a simple method is to just add another Gaussian Blur after the color curves to smooth out the banding. While it's not perfect, it works like a simple anti-alias.
Expanding and Contracting the Shadow
There are two ways to change the size of the shadow, a simple and easy one, and a more complicated one.
The easiest method is to simply use the transform mask that we used to move the shadow around and use it to scale the shadow. This is probably what you want to do if you want to make it look like there is a light source close to an object that makes its shadow appear bigger, or in some cases the opposite, smaller.
However, if you are working with shadow for text, you want something more orthographic so that every letter receives a similar effect. In this case the method would be to expand or contract the shadow by adding or removing pixels from its border. To do this, you will need to change the structure of the layers a bit if you have used blurring, spread, and contour as described above.
1: place Clone of Source inside a layer group called "Shadow Settings," and move your blur and color adjustment filters upward so they are applied to the group instead of directly the clone layer. Additionally, also move the color overlay effect to the layer group. You can do this easily by using the Copy Layer Style option in the context menu.
- Drop Shadow Effect (Layer Group)
-- Color Adjustment (Filter Layer)
-- Gaussian Blur (Filter Layer)
-- Shadow Settings (Layer Group, Color Overlay FX)
--- Clone of Source
---- Transform Mask
The order in Krita is a bit confusing if your use filter masks instead of filter layers, but essentially what we are doing is controlling the order of operations. We need to contract or expand the drop shadow BEFORE applying the Gaussian blur, and we can do this by doing our size change inside a layer group. The result of the size change is "saved" temporarily inside Shadow Settings when Krita processes the effect, and this "saved" image is what Krita will apply the blur to.
2: open the layer styles of Clone of Source and add a stroke effect.

The settings we want are:
Blend Mode: make this Normal.
Color: doesn't matter because the Color Overlay FX we moved to Shadow Settings will replace the color of the Stroke anyway.
Note: if you have both Color Overlay and Stroke in the same layer, the Color Overlay doesn't apply to the Stroke, so you can have a Stroke that is a different color from the Color Overlay. In our case, it would mean that if we wanted to change the color of the shadow, we would have to remember to change it in two places, hence why we have to move the Color Overlay to the Shadow Settings group.
Size: this is how many pixels we want to add OR remove from the shadow.
To make the shadow bigger: set Opacity to 100% and Position to Outside. This will add opaque pixels at the border of your Source.
To make the shadow smaller: set Opacity to 0% and Position to Inside. This will replace existing opaque pixels at the border of your Source with fully transparent pixels.
Noise on Drop Shadow and Patterned Drop Shadows
The last setting that we can recreate is adding noise to the shadow. To do this all we need to do is create a layer with a noise pattern, or any other pattern, and use that layer as the mask for our Shadow Settings.
1: create a new fill layer above Shadow Settings, and select Simplex Noise, with a high frequency.
2: add a cross channel adjustment filter mask to the fill layer, and use it to convert lightness into alpha.

3: set its blend mode to Erase or Destination In.
4: you can change the Opacity of the fill layer if it's Erase to alter how much effect its masking has on the shadow. Otherwise simply change the minimum and maximum opacity directly in the cross channel adjustment filter mask you have already added to the filter layer.