Gradient Map (Filter)

Share

What is a "Gradient Map" in an Image Editor?

Gradient map is a filter commonly found in image editors that maps the colors of one layer to a specified gradient according to their lightness.

A dialog window titled "New Filter Layer - Krita." It has two panes: on the left a list of filter categories, in it "Map" is expanded with the follow items: Gradient Map (selected), Normalize, Palettize, Phong Bumpmap, Round Corners. In the main pane, the top row of widgets: "Default" (a dropdown list button), Use last preset (unchecked), Edit Presets (button), XML (button). Then two tabs: Gradient Colors (active), color mode. In the gradient colors tab, various rows of widgets. The first: a plus button, a save button, a button that reads "Convert to Segment Gradient," a button with a down arrow that reads "Choose Gradient Preset." And an icon that is three horizontal lines. A textbox labelled "Name" (value: Blue to Red). A complex widget to edit the gradient, showing a blue to red gradient. A left and right arrow icons, next to the "Stop #1" label, a trash can icon, an icon that appears to mean mirroring, an icon that is a graysale gradient with an right arrow under it, an icon that is a rainbow gradient with a right arrow under it, an icon that is two small rectangles. Under a large rectangle with a red and blue gradient, two control points that are tear-shaped, the left one is blue, the right one is red. Below, two icons that appear to change the order of squares, a wheel, a button to pick a color (blue is selected), a box to change the opacity (100% is selected), and a box to change the position (0% is selected). At the bottom of the dialog, two buttons: cancel and OK.
The Gradient Map filter settings in the New Filter Layer dialog in Krita.

How the Gradient Map Filter Works?

Let's say we have a gradient that goes from red to blue. We say that red is 0% and blue is at 100% in respect to the full length of the gradient. Purple would be at the 50% position of the gradient, since it's between both extremes. Then all we need to do is calculate a value from 0% to 100% for every pixel of the image.

The algorithm to calculate the gradient position of a pixel's color is normally simply taking its lightness. In other words, black pixels are mapped to the position 0%, and white pixels are mapped to the position 100%. Everything between black and white gets mapped to some position in the middle of the gradient.

Tricks

Controlling Extremes Before Mapping

An easy method to control the extremes of a gradient map before the gradient map filter is applied, specially useful in non-destructive editing, is to use a Levels filter to

Non-Lightness Mapping

Although it's theoretically possible to map to the gradient using other values than lightness (e.g. use only the value of the red color channel to compute the position of the color in the gradient), normally image editors don't allow you to select any specific method. To achieve this, we must use a different filter to create a lightness-based image from the values we want before before we use the gradient map filter, e.g. by using color adjustment curves to remove blue and green.

Examples of Gradient Map in Use

Some examples of effects of effects created with gradient map:
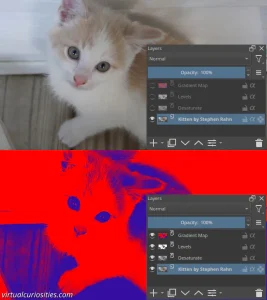
A photo of a kitten, next to it a layer structure in Krita that creates a blue and red duotone effect. The structure includes a gradient map, then a levels filter, then a desaturate filter, and finally the photo of the kitten.
The layer structure of a duotone effect created in Krita. Photo: Stephen Rahn via Flickr.
A non-destructive gradient halftone effect created in Krita.
Written by Noel Santos.

About the Author

I'm a self-taught Brazilian programmer graduated in IT from a FATEC. In a world of increasingly complex and essential computers, I decided to use my technical expertise in hardware, desktop applications, and web technologies to create an informative resource to make PC's easier to understand.

View Comments