To uninstall an application on Windows 11, follow the following steps:
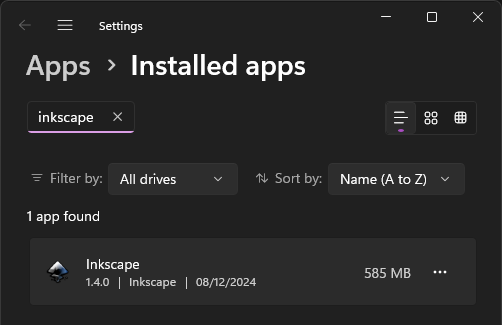
1: open the start menu [how?] and type "add or remove programs." Select the first option that will appear, subtitled "System settings." This will display a window that lists all your "Installed apps," i.e. all software that you have installed in the operating system through conventional means.


2: in the search box that reads "Search apps," type the name of the application that you wish to uninstall. In this article, we'll uninstall "Inkscape," since they recommend uninstalling an existing version of Inkscape before installing a new one. So we would type "Inkscape" in the search box.
3: click on the three dots button on the right side of the application in the filtered list to display a dropdown menu.

4: click the option Uninstall. A dialog box will appear asking for confirmation.
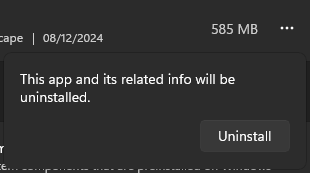
5: click on the Uninstall button. This will execute the uninstaller associated with the application.
Note: if the application was installed by the administrator, you might be asked the administrator's password in order to uninstall it.
Different applications have different uninstallers, so what happens next depends on what applications you tried to uninstall. Typically, what will happen is that a dialog window will appear with a step-by-step wizard, and all you need to do is click "Next" a few times to uninstall the application. After that, the application will be uninstalled and the space freed.
In Inkscape's case, a dialog box with a progress bar appeared, and, after a few seconds, the application was uninstalled without me doing anything. I'd preferred a multi-step wizard, to be honest.
Tip: the number next to the application name is the estimated amount of space the application occupies, e.g. 585 MB means it's occupying half a gigabyte and if you uninstall it you'll free half a gigabyte that you can use for installing other things. It's possible to sort the applications by the amount of space the occupy in case you want to free a lot of space quickly by uninstalling the largest applications you have installed. In general, the largest applications will be games.
Warning: avoid uninstalling things that you don't recognize. Sometimes when you install an application, it installs additional software that the application needs in order to function, so if you uninstall this software your applications will stop working unexpectedly. For example, .NET and Java runtimes are necessary to run applications made with those runtimes. If you uninstall Java, you won't be able run things that use Java until you reinstall Java. It's a good idea to Google the name of something to learn what it is before considering whether to uninstall it.
Observations
Why a menu?: on Windows 7, the equivalent window has a toolbar above a simple list of applications. In this toolbar you would find a button that reads "Uninstall" which uninstalls the selected application in the list. I feel this is a billion times simpler and more obvious to a user than hiding the option inside a three dots button. I wish I could understand what drives Microsoft to design interfaces like these?
No contrast: in the dark theme, the dropdown menus and dialog boxes have no border and very little contrast, so I assume it can be difficult to tell where they are in screenshots. It might look like something isn't a interface element "floating" over the main elements, but it is, it just has no contrast in this theme for some reason!
I guess we dark mode now: typically I use a secondary Windows account to make these tutorials that has everything in its default settings, including light mode. For some reason I wasn't able to find Inkscape while logged in in that account, so I figured I'd just use my main account and switch to light mode for consistence. Unfortunately, it seems I can't switch to dark mode anymore? I haven't activated Windows, so there are restrictions on what I can personalize (e.g. I can't set a wallpaper), but I'm pretty sure I was able to switch from light mode to dark mode in the past considering I literally an account in dark mode and one in light mode. I guess some recent Windows update remove this ability, so they are stuck like that! I hope nobody switched from dark mode to light mode or vice-versa temporarily just to try it and then a Windows update locked them in a theme they don't like.